RSS

Apple Pie

(servings: 8 slices, Active Time: 1 hr., Cooking Time: 1 -1.25 hrs)

__________________________________________________________________

Ingredients:

1 All Butter Pie Crust 
4 lbs apples ( 5 granny smith, 3 macintosh)
1/2 lemon zest
2 tbsp lemon juice
1/2 c white sugar
1/2 light brown sugar
1/4 c all-purpose flour
3/4 tsp ground cinnamon
1/2 tsp ground nutmeg
1/8 tsp all spice
1/2 tsp vanilla
1 egg with 1/4 c water (egg wash)

_________________________________________________________________

Gadgets:

9″ pie plate, large mixing bowl, rolling-pin, brush for egg wash

__________________________________________________________________

 Directions:

1. Roll out two disks of all butter dough one at a time. Make sure to keep cold! When rolling out, flour surface and roll out from center of dough using rolling-pin. Pivot rolling-pin as you roll, and push out dough from center in all directions until it is flat, smooth, and round. If dough breaks while you are pushing it out, pinch breaks together. Again, try to touch dough as LITTLE as possible!

2. When first disk is rolled out, roll it gently onto rolling pin and fold it into pie dish. Put this dough in the refrigerator and roll out other disk. When this disk is rolled out, place it on a plate or baking dish and refrigerate as well.

3. Wash, peal, and core all of your apples. Slice apples into quarters and then cut all quarters into thirds horizontally. This will give you a nice chunky apple pie… as it should be!

4. Put lemon zest, lemon juice, sugars, flour, spices, and vanilla into large bowl with apples and gently mix together. It is OK to let apples sit in mixture while oven is preheating. The time will let the sugars draw the sugar out of the apples, letting the flavors meld.

5. Pre Heat oven to 350 degrees.
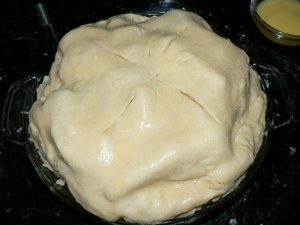
6. When over is preheated, take pie plate with dough out of refrigerator. Pour entire apple mixture into dough. Remove second rolled out dough from the refrigerator and lay it on top of apples. This is where you can bring the edges of the top and bottom crust together and pinch all the way around. To add detail, you can also scallop the edges with your fingers or crimp with a fork.

7. Whisk one egg with 1/4 c water to make a wash and gently brush the entire top of your pie.
8. Cut vents or a design into the top of your pie and place in the oven. Bake pie for about 1 hr to 1.25 hrs. Your pie is done once the juices are bubbling and the top is a light brown.

Note: Try to move as quickly as possible in order to keep your dough cold. 

Pat yourself on the back and dig in! Good Job!

 
6 Comments

Posted by on October 29, 2011 in Baking, Dessert


Tags: , ,

All Butter Pie Crust

(servings: enough for a 9″ double crust, Active Time: 1/2 hr)
Recipe adapted from The Shiksa in the Kitchen 

__________________________________________________________________

Ingredients:

3 c all-purpose flour
1 tsp salt
1 c (2 sticks) very cold unsalted butter (try for Land O Lakes)
4 ice cubes in 1/2 c cold water
_________________________________________________________________

Gadgets:

Fork, Dough Cutter, Plastic Wrap, large mixing bowl, Rolling Pin, Refrigerator, Freezer

__________________________________________________________________

 Directions:

1. Chill Fork and Dough Cutter in Freezer, and large bowl and bowl of iced water in Refrigerator while pulling ingredients.

2. Add flour and salt in large bowl and blend thoroughly

3. Add very cold butter to large bowl and cut into dry ingredients using dough cutter. Push down firmly with a lot of pressure. Do this repeatedly until butter is cut into small pea size pieces. Once it has a large grainy consistency put bowl in freezer for two minutes.
NOTE: butter chunks ensure a flakier dough and constant cold keeps the butter from melting.
4. Remove bowl from freezer and iced water from refrigerator. Add iced water to dough mixture one tbsp at a time and toss around with your cold fork until well incorporated. Try not to touch the dough as you want to keep it COLD.
5. Keep adding tablespoons of water with fork until dough looks stringy and holds larger clumps. To test when the dough is wet enough, put a clump in your palm and squeeze. If it is slightly wet and tacky, and can hold together once squeezed, your dough is ready for the next step! If the dough falls apart in your palm or easily crumbles add a little more water and test again.

6. When the dough is ready, pull it together lightly in your hands into two balls (one larger than the other). Form the balls into flat disks that are about 7-8 inches across.

7. Wrap dough disks in plastic wrap and refrigerate for 1- 48 hours. The dough can also be frozen for up to 3 months, but make sure to thaw it out before using.

Note: I cannot stress ENOUGH how important it is to keep the dough cold! Even if you REALLY have to go to the bathroom, put everything in the refrigerator before you leave!

Good Luck! And remember: Don’t be scared, it’s just a pie crust. 🙂

 
6 Comments

Posted by on October 29, 2011 in Baking, Dessert


Tags: , ,

Banana Strawberry Mini Muffins

(servings: 24 mini muffins, Active Time: 30 min, Cooking Time: about 18 min)

__________________________________________________________________

Ingredients:

2 1/4 c all-purpose flour
1 1/2 tsp baking powder
1/4 tsp baking soda
1/2 tsp salt
1 tsp ground cinnamon
1 tsp pure vanilla extract
1/2 c (1 stick) unsalted butter (melted)
3/4 c light brown sugar
2 large eggs (lightly beaten)
2 large ripe bananas / 1 c (mashed)
1 c fresh or thawed frozen strawberries (cut bite size)
_________________________________________________________________

Gadgets:

Spoon or Spatula, mini muffin pan
__________________________________________________________________

 Directions:

1. Preheat oven to 350 degrees F.
2. Line muffin cups with muffin liners or spray with non-stick cooking spray ( I sprayed for a rustic effect)
3. In a small bowl or sauce pan, melt butter and set aside
4. In a medium bowl, whisk together brown sugar, vanilla extract, eggs, and mashed banana. Stir in melted butter. 
5. In a larger bowl, combine dry ingredients, including cinnamon. Fold in strawberries and make sure they are coated with the dry mixture.
6. Add the wet mixture to the dry and stir until just combined (No more!)…You may still see specs of flour and that is OK.
7. Pour batter into mini muffin cups to the top (this ensures a pillow-y muffin top). Bake in oven for 15-20 min or until tops are golden brown and have a spring to them.
8. Cool muffins and pop them in!

Note: Batter can be divided into larger muffin cups, baking time just has to be adjusted.

 
Leave a comment

Posted by on October 24, 2011 in Baking


Tags: ,

Maple Spiced Bread Pudding

(servings: 2-4, Active Time: 30 min, Total Time: about 2 hrs)

__________________________________________________________________

Ingredients:

1/4 left over loaf of bread (either brioche or challah bread work best); whole loaves are usually about 1.5 lbs
 2 large eggs
 8 fl oz. heavy whipping cream
1/4 c. sugar
1/4 c. Vermont maple syrup (or another of good quality)
1 tsp. vanilla extract
1/4. tsp. nutmeg
1/2 tsp. cinnamon
Dash of salt

__________________________________________________________________

Gadgets:

Small Loaf Pan, Medium Bowl, Whisk, Spoon or Spatula

__________________________________________________________________

 Directions:

1. Chop left over bread into cubes, approx. 3/4 inches and set aside
2. In a medium-sized bowl, whisk together eggs, cream, maple syrup, sugar, vanilla, spices, and dash of salt. Whisk gently until blended
3. Drop bread cubes into wet ingredient mixture and stir gently until bread is coated
4. Let mixture sit for about an hour at room temperature, stirring occasionally
5. Preheat oven to 375 degrees.
6. When bread pudding mixture is done ‘marinating’ and bread is fully soaked, turn mixture into greased small loaf pan and make sure it is evenly distributed. Place in oven for about 40 minutes or until bread is puffed up, the top is golden brown, and a toothpick inserted in the center comes out cleanly.
7. Remove from oven and enjoy!

This bread pudding can be eaten straight out of the oven with a scoop of ice cream, but the flavor and texture really comes together if you let it refrigerate for about an hour.

Note: Measurements in this recipe are for a small portion. Feel free to enhance depending on your desired amount of servings (ie. using a full loaf would require 4x the measurements indicated)

 
Leave a comment

Posted by on October 2, 2011 in Soup


Tags: ,

Challah Bread

(servings: varied, this one yielded 2 small loaves; Active Time: 45 min, Total Time: about 4.5 hrs)

__________________________________________________________________

Ingredients:

1 packet of instant yeast
 3/4 cups water (luke warm)
1 tsp sugar
3 eggs, plus one for egg wash
3 1/2 cups all-purpose flour
1 tsp salt
1/4 cup vegetable oil
1/4 cup honey
__________________________________________________________________

Gadgets:

One large bowl, Baking Sheet, Whisk, Wooden Spoon

__________________________________________________________________

 Directions:

1. In a large bowl, stir yeast  and 1 tsp sugar into 1/4 c luke warm water and let slurry for 10-20 minutes uncovered until it is slightly puffed
2. One at a time, whisk in eggs, oil, honey, remaining water, and salt until well blended. Add flour gradually and mix in with wooden spoon. Once the dough is starting to form, use your hands until it comes together.  
3. Roll your dough out onto floured work surface and knead until it comes together into a firm, smooth ball. The dough will be stiff but pliable. While you are doing this, make sure to soak and clean the large bowl in warm water.
4. Once your dough is ready, place it in your clean large bowl, cover with plastic wrap and place in a warm area for 2 hrs, or until it has doubled in size
         *Note: There are a variety of tricks for this, such as placing dough in a warmed oven with bowl of water beneath it, place it on top of
        a heating pad, or keep it on top of a warmed oven. Use whatever is best for you, get creative.
5. When the dough has risen, punch it down. It is at this point when you can knead in your sweets if you choose to do so (ie raisins, apple, etc.)
6. It is now time to shape your dough. There are a variety of ways to do this as well. Such as braiding (3,4,6 strands) or spiraling. I found this MSNBC Article about Maggie Glezer’s approach to be a good reference. Once you have shaped your dough, wash it with an egg wash and let it sit for another 1-2 hours until it has tripled in size. You can pre heat your oven at this point to 350 degrees.
7. Wash your newly risen dough(s) with another egg wash and place in the oven for 35- 40 minutes, or until they have a nice deep golden sheen to them. Remove from the oven, let cool, and nash away!

Note: If you do not have the time in one day to prepare, the dough can be refrigerated between stages. Just make sure to bring to room temperature before continuing on.

Note Note: This dough is not easy to get on your first  time around. You may need to play with your levels of water and rising techniques before it is perfect.Don’t give up!

 
Leave a comment

Posted by on September 29, 2011 in Bread, Jewish


Tags: , , ,

Roasted Tomato and Garlic Soup

(servings: 2-4, Active Time: 30 min, Cooking Time: about 2 hrs)

__________________________________________________________________

Ingredients:

2.5-3 lbs plum tomatoes (halved)
 2 large cloves garlic
 4 cups low sodium chicken brother
2 tbsp. EVOO
1 tbsp. thyme (dried)
 1 bay leaf
1/4 tsp. red pepper flakes (or to taste)
salt and pepper

__________________________________________________________________

Gadgets:

Food Processor, Baking Sheet, Tin Foil, Pot, Wooden Spoon

__________________________________________________________________

 Directions:

1. Preheat oven to 400 degrees
2. On baking sheet, lay down foil and arrange all halved tomatoes cut side up. Sprinkle generously with salt and pepper and drizzle with EVOO
3. Fold garlic cloves (UNPEELED) into tin foil pocket and place on baking sheet with tomatoes
4. Put tomatoes and garlic into preheated oven and roast for about an hour, or until tomatoes are golden brown on top
5. Remove tray from oven and cool slightly. Put tomatoes into food processor with PEELED garlic cloves and pulse until contents resemble a chunky tomato sauce.
6. Heat drop of EVOO on high heat in pot and add processed tomatoes. Proceed to add spices and chicken broth. Stir ingredients together, let them come to a boil, and then lower heat to bring soup to a simmer. Let the soup simmer uncovered for about 25 minutes.
*7. Season your soup to taste and serve! Voila!
* At this point, I would recommend adding your choice of cheese, crouton, or sour cream (or all of the above)

Note: This soup was light and extremely flavorful. Next time I might add a tomato paste or cream while simmering just to thicken it up a bit.

 
Leave a comment

Posted by on September 27, 2011 in Soup


Tags: ,